Applying a grid shift to point clouds
Introduction
This tutorial first appeared on Land Information New Zealand’s On-Location Blog.
It describes how to use Conda, PDAL, and GDAL to apply a grid shift to point cloud files. It uses PDAL’s readers.las to fetch the data, filters.reprojection to apply the grid shift, and writers.las to write the reprojected point cloud.
The data used in this tutorial is available for free under a CC-BY 4.0 license on Land Information New Zealand’s LINZ Data Service.
The tutorial will be reprojecting point cloud files from:
A New Zealand local vertical datum to the New Zealand Vertical Datum 2016 (NZVD2016).
New Zealand Geodetic Datum 2000 (NZGD2000) to NZVD2016.
Finally, NZVD2016 to NZGD2000 or to a local vertical datum.
Background
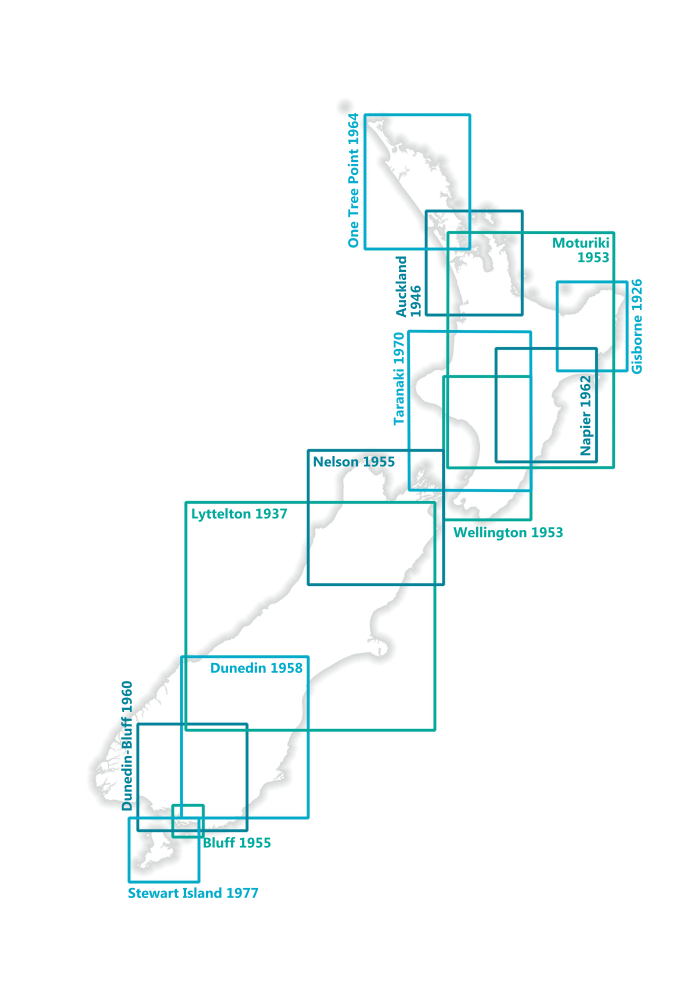
Historically in New Zealand, heights were defined in terms of 13 local vertical datums (LVD) referenced to an estimate of the local mean sea level (MSL).
In 2016, New Zealand Vertical Datum 2016 (NZVD2016), which is defined by the NZGeoid2016 geoid, became the official national vertical datum for New Zealand. The general relationship between the different datums is shown in the diagram below.
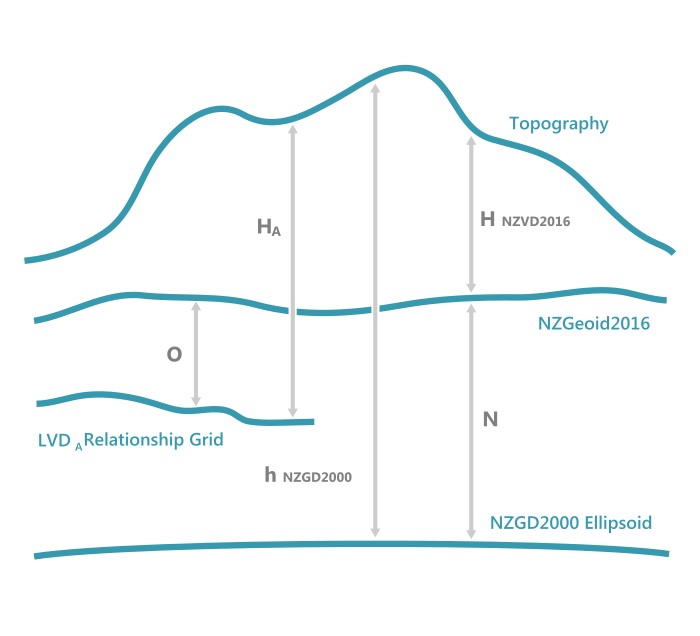
Available on the LINZ Data Service (LDS) are relationship grids which model the difference between the local vertical datums and NZVD2016 (O in the above diagram).
The NZ Quasigeoid 2016, also a relationship grid, models the difference between the NZGD2000 ellipsoid and NZVD2016 (N in the above diagram).
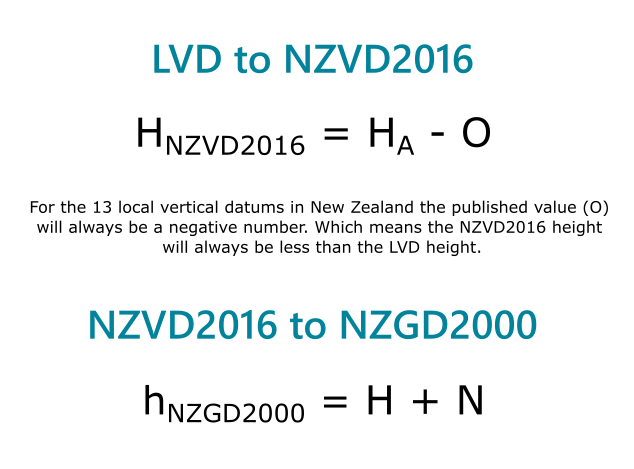
The equations to transform heights using the published values in the relationship grids are:
Before we begin
We will be using multiple tools to perform the reprojection. To retrieve these tools and have them all accessible in a nice self-contained environment we will be using a system called Conda. Conda is an open source package and environment management system that runs on Windows, macOS, and Linux. Essentially we will create an environment within Conda which will contain the packages we need: PDAL, GDAL and Python.
Install Conda
Download Miniconda, selecting the 64-bit installer for your platform and install it as directed.
Create a Conda Environment
After installing, open the Anaconda Prompt from your start menu.
When you begin using conda, you already have a default environment named
base. We don’t want to put programs into our base environment so we’ll create a separate environment just for doing this reprojection. To do this, type:conda create --name vd-reproject
It will check for the additional packages/dependencies that are needed, and will ask if you want to proceed. Say yes.
Proceed ([y]/n)? y
To start to use the new environment and install our required packages within it, we need to activate the environment first:
conda activate vd-reproject
Note
After the environment is activated the name of the environment appears as
(vd-reproject)at the beginning of the command line. This indicates that you’re now inside the environment.Finally, we need to install the tools/packages we will be using.
conda install -c conda-forge pdal gdal
When these packages are installed, they will also install the packages they’re dependent on to run. Python is one of these dependent packages, so we won’t need to install it ourselves as conda would’ve already done it for us.
Now that the packages are installed, we are ready to begin.
Step 1: Create a Datum Transformation Grid (GTX)
PDAL allows for the use of PROJ.4 strings to define the spatial reference system of the inputted or outputted data. This is great, because it gives us the ability to use +geoidgrid which is an option to add a grid shift file in the format of NOAA Vdatum’s GTX file format. But where to we get a GTX file from? We have two options:
Option 1 — LINZ supplied GTX file
LINZ has created GTX files for each of the relationship grids mentioned earlier. They can be downloaded from https://www.geodesy.linz.govt.nz/download/proj-datumgrid-nz
Here is a list of which GTX file belongs to which Local Vertical Datum:
Auckland 1946: auckht1946-nzvd2016.gtx
Bluff 1955: blufht1955-nzvd2016.gtx
Dunedin 1958: duneht1958-nzvd2016.gtx
Dunedin-Bluff 1960: dublht1960-nzvd2016.gtx
Gisborne 1926: gisbht1926-nzvd2016.gtx
Lyttelton 1937: lyttht1937-nzvd2016.gtx
Moturiki 1953: motuht1953-nzvd2016.gtx
Napier 1962: napiht1962-nzvd2016.gtx
Nelson 1955: nelsht1955-nzvd2016.gtx
One Tree Point 1964: ontpht1964-nzvd2016.gtx
Stewart Island 1977: stisht1977-nzvd2016.gtx
Taranaki 1970: taraht1970-nzvd2016.gtx
Wellington 1953: wellht1953-nzvd2016.gtx
There is also a GTX file for the Quasigeoid which would be used if converting between NZVD2016 and the NZGD2000 ellipsoid.
New Zealand Quasigeoid 2016: nzgeoid2016.gtx
Option two — Create a GTX file
You can create your own GTX file using the relationship grids available on the LDS. For example, if you intend to convert from Moturiki 1953 to NZVD2016, you have to do the following:
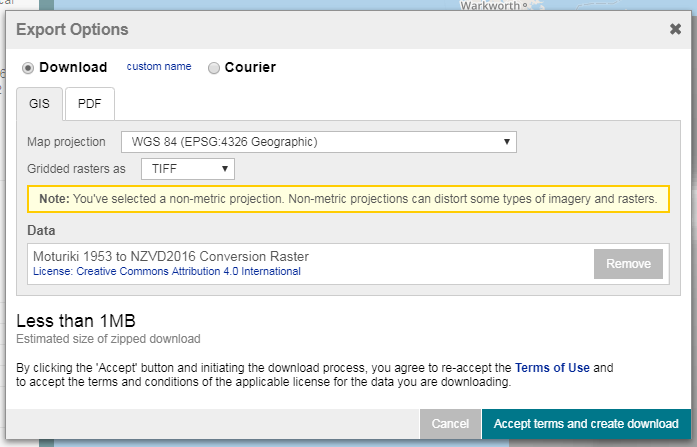
Download the ‘Moturiki 1953 to NZVD2016 Conversion Raster’ as a TIFF from the LDS in ‘WGS 84 (EPSG:4326 Geographic)’ Map projection. https://data.linz.govt.nz/layer/103959-moturiki-1953-to-nzvd2016-conversion-raster/.
Open the Anaconda Prompt from the start menu and activate the environment we created earlier:
conda activate vd-reproject
Navigate to the location of the downloaded TIFF file and execute gdal_translate to convert the TIFF file to a GTX file:
cd path/to/TIFF/file

gdal_translate -ot Float32 "moturiki-1953-to-nzvd2016-conversion-raster.tif" "moturiki-1953-to-nzvd2016-conversion-raster.gtx"
Note
-ot Float32indicates the data type of the output image’s bands. GTX files only support Float32.
Step 2: Prepare a JSON Pipeline file
We will be using a PDAL pipeline to transmit a chain of processing elements into PDAL. These elements will be represented in a JSON file.
Using a text editor, create a JSON file named pipeline.json containing the contents as below.
{
    "pipeline":
        [
            {
                 "type": "readers.las",
                 "filename": "#"
            },
            {
                 "type": "filters.reprojection",
                 "in_srs": "EPSG:2193",
                 "out_srs": "EPSG:2193"
            },
            {
                 "type": "writers.las",
                 "filename": "#",
                 "a_srs": "EPSG:2193",
                 "forward": "all"
            }
        ]
}
Update the srs details for in_srs, out_srs and a_srs to the EPSG code of the horizontal map projection your source LAS files are in. In the example above we are using New Zealand Transverse Mercator 2000 (EPSG:2193).
Warning
Be aware "forward": "all" under the writers.las section represents the header fields whose values should be preserved from the source LAS file. all will transfer all header fields, including scale and offset values, as well as VLRs. If you desire to transfer only specific header fields, refer to https://pdal.io/stages/writers.las.html for more information about this option.
Step 3: Use PDAL to reproject
Reprojecting one file from LVD to NZVD2016
Using the Anaconda Prompt, activate the vd-reproject environment:
conda activate vd-reproject
Then issue the following command to reproject one file (of course, replace the files and paths to suit your needs).
pdal pipeline "path/to/your/pipeline.json" — readers.las.filename="path/to/source_las_file.las" — writers.las.filename="path/to/reprojected_las_file.las" — filters.reprojection.out_srs="+init=EPSG:2193 +geoidgrids=path/to/your/gtx_file.gtx"
Reprojecting multiple files from LVD to NZVD2016
Below is a python script which executes multiple LAS files. Save to your computer as lvd_to_nzvd2016.py, then open in a text editor and update src_directory, gtxfile, jsonfile, horizontal_srs with the necessary information.
Note
The file is also available from https://gist.github.com/rclarkelinz/d48de5c0432f5c00d02a452e6d1d3bc3
import os
import sys

src_directory='/path/to/diretory/with/las/files'
gtxfile='/path/to/yourgridfile.gtx'
jsonfile='/path/to/pipeline.json'
horizontal_srs='EPSG:2193'

dest_directory = src_directory + '/reprojected'
if not os.path.exists(dest_directory): os.mkdir(dest_directory)

for filename in os.listdir(src_directory):
    if (filename.endswith('.las') or filename.endswith('.laz')):
        print('Reprojecting ' + filename)
        pdal_cmd ='pdal pipeline {} --readers.las.filename={}  --writers.las.filename={} --filters.reprojection.out_srs="+init={} +geoidgrids={}"'.format(jsonfile, src_directory + '/' + filename, dest_directory + '/' + filename, horizontal_srs,gtxfile)
        os.system(pdal_cmd)
To execute the script, open the Anaconda Prompt, activate the vd-reproject environment and then navigate to where you have saved the script and issue this command:
python lvd_to_nzvd2016.py
This script creates a new directory called ‘reprojected’ in the same location as the LAS files. On completion the reprojected LAS files will be located in this directory, ready for your GIS needs.
You can spot check the accuracy of the conversion by using the LINZ Online converter: www.geodesy.linz.govt.nz/concord
Reprojecting from NZGD2000 to NZVD2016
The steps to do this reprojection are the same as above except for one change:
In Step 1, for option one, the GTX file required will be nzgeoid2016.gtx. Or, if you are following option two, the relationship grid on the LDS is the NZ Quasigeoid 2016.
NZVD2016 to NZGD2000 or LVD
Previously, the grid values are being subtracted from the point cloud value in Step 3. To reproject to NZGD2000 or an LVD, the grid values need to be added to the NZVD2016 value.
To accommodate this change in PDAL, you need to alter the following text in the PDAL command from filters.reprojection.out_srs to filters.reprojection.in_srs.